Tuesday 31 July 2012

Beacon satellites and KAIRA


150 MHz beacon satellite COSMOS 2454 drifting through a stationary beam pointed at direction of closest approach. 
As we are slowly starting to get the system up and running, we are doing various passive measurements to ensure that the system is in fact working as we would expect it to. One of the passive tests that we are doing is measurements of beacon satellites that fly over KAIRA. More specifically, we are using beacon satellites that transmit 150/400 MHz frequency pairs. We are using these types of satellites already for recording relative electron density curves in another project. With KAIRA we can of course only listen to the 150 MHz band, but this already gives us a nice way of observing our beam patterns. Here is result of the first such test, for a COSMOS 2454 that passed over with a peak elevation of 87.3 degrees. We used one beam to observe at the direction of the closest approach and recorded the signal power within a 200 kHz band. As expected, as the satellite passes the beam, we see the power fluctuating as it goes through the main and side lobes of our receiver beam. In the upcoming days we will be doing more such tests, comparing carefully the location of the satellite with the received signal power.

While the Astron group did a lot of tests that could be considered first light, this is the first light measurement with KAIRA for me.

The LBA cable mausoleum

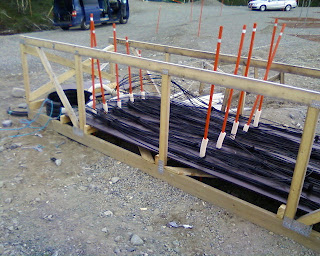
As we've seen recently, we've been adapting cables to get the suitable lengths. However, these lengths are still fixed, and the antennas themselves are are quasi random distances. Thus, there is additional cable to "bury". On conventional LOFAR stations, this is done by physically burying them... hence the term "cable grave". On the KAIRA site, due to the freezing ground and other environmental complications, we have ours encased above ground in a so-called "mausoleum".

Today, as promised, we have some photographs of the fitting of the cables in the LBA mausoleum.

The LBA cable mausoleum. Seen strewn about are some cables that are only partly deployed. To allow us to stop things from getting mixed up and tangled, they are drawn out along the site until they are ready to be inserted into the ducts. (Photo: D. McKay-Bukowski)

The "U-boat hatch". This pipe goes down into the ground to where the entrances to the long main cable ducts are. This is a very cramped space and is quite difficult to work in. (Photo: D. McKay-Bukowski)

Paying out the draw string for the cables. The total duct length is over 50m and pulling the lines through this length can be quite challenging. Even after we opened the intermediate draw pits the force required on the lines is still quite high. (Photo: D. McKay-Bukowski)

Surplus cable in the mausoluem itself. We took immense care to ensure that no looping occurred in the cables as they are folded into the space. (Photo: D. McKay-Bukowski)

Monday 30 July 2012

A new view from Saana

A few days back, some of the team went for a hike up Saana Mountain. From near the summit, it is possible to get a good view of the KAIRA site.

The view of KAIRA from Saana. (Photo: A. Jutila)

The grey at the top of the image is actually the water of Siilasjärvi. The buildings to the front left are the Customs Station on the Fenno-Norwegian border. (The actual border is to the right of this image; KAIRA is definitely still in Finnish territory!) At the time this photograph was taken, we were mid-way through the build of the LBA array.

Cutting new cables

In yesterday's post, we went through the reasons why we need particular lengths and how we were going to optimise the cable deployment. Today, we have some photographs. These show some of the steps involved in adapting our existing cable set to the altered site conditions.


The "workshop". This is one of the site shipping containers, temporarily fitted out to provide a cable assembly area. (Photo: D. McKay-Bukowski)


Fitting new connectors to the end of a cut cable. (Photo: D. McKay-Bukowski)

Tools of the trade. Various cutting tools, connectors, and the portable cable analyser units. These are used to measure the propagation delay of the newly completed cables. (Photo: D. McKay-Bukowski)

And, finally, here are some cut and prepared 40m cables, ready for deployment on the KAIRA LBA field. (Photo: D. McKay-Bukowski)

Sunday 29 July 2012

The cable plan

When we designed the LBA array, the original plan was to locate it on the tundra field to the northeast of the HBA array. As we have reported before, this proved to be impossible, due to problems with the soil, snow and prevailing conditions. These things happen in science, but the important thing is that the project can adapt to setbacks and adjust accordingly so that alternatives and workarounds can be found. In the case of the KAIRA LBA array, we have instead deployed the aerials in the solid area to the southeast of the HBA array. In terms of ground stability, this area is perfect. However, it does present a challenge in that extra length is required on the connecting cables.

To overcome this, we are making use of the existing cable set that we have. Firstly, we carefully planned the system of ducts and nodes, and then determined what cable lengths could be expected.

Diagram of the LBA field, with cable runs marked. The shading indicates the length of the cable required to a given location. The lighter the shading, the longer the cable length. The lengths are all calculated by the routing/planning software that we have written, thus allowing us to optimise the use of the existing cables, and thus minimise waste and keep down cost.

Then, the installation order and placement was determined. We compared this to our cable inventory, of the parts that we actually have and worked out that we could complete the array with the following lengths:

     2 × 80m pairs
     20 × 115m pairs
     24 × 120m pairs
     2 × 130m pairs

In fact, the 120 and 130m lengths were made by joining cables together. The 130m lengths were made by joining existing 80m and 50m cables from our inventory together. The 120m cables were made by joining existing 80m cables with 40m cables. There is no standard 40m cable length, so the ones we used were made by cutting a 80m cable in half.

As you can probably tell, we have lots of 80m cable lengths in our inventory.

The reason why the cables come in set lengths is for ease and cheapness of manufacture. The tolerances on the cable lengths that we use are quite strict, so we need to control this process quite carefully. Additionally, it is important that the propagation delay (how long it takes the signal to travel down the cable) is known very accurately... ideally to a fraction of a nanosecond. You make remember from our "how it works" series, that the pointing direction of the instrument is controlled by controlling the signal path delays. So, to be able to do this well, you need to know the existing delays in all the cables before adding any more.

This work has now been done and we are putting together the calibration tables now. I will post some photographs for the cable work, along with some others from the LBA build tomorrow.

Saturday 28 July 2012

Drawing the line

The LBA-cable-mausoleum (also known as the "Postila mausoleum") is getting pretty full these days. With more and more aerials being installed, it is difficult to manoeuvre in and the cables are getting increasingly hard to pull through. Here are some photographs from this process.

Firstly, it is important to recall that the cables are installed "backwards". Although the signals go from the aerials to the RF-container, the cables are physically installed the other way. Each pair (X and Y polarisation cables for each antenna) are inserted into the ducts and are drawn through the long pipes to the common point at the edge of the LBA field. This is where the LBA-cable-mausoleum is located.

Here, there is a large piece of vertical agricultural drain, large enough to fit a person in, and certainly big enough for a lot of cables. We refer to it as the "U-boat hatch", as that's about the size of it and it occasionally floods with water. (Incidentally, the flooding problem has now been fixed as we've added a new drain to the side to get the water out.) We wrote about the installation of this hatch earlier (LINK).

In the finished state, the cables will go into the mausoleum itself to "burn off" excess length due to the non-uniformity of the array. However, during the installation they are first installed directly into the white ducts that go from the mausoleum to the nodes. There are a number of different cable nodes on the field, each server a few aerials. Each node has its own narrow duct, and the cables need to be fed into the correct duct and drawn through to the node itself.

Feeding the cables in to the white duct pipes. The thin white lines are the draw strings. (Photo: D. McKay-Bukowski)

The cables are pulled through to the nodes where they branch off to the individual aerials according to the trenching plan.

Pulling the cables through to the node. From there, they go in pairs to individual antennas. (Photo: D. McKay-Bukowski)
Once a cable pair has been pulled through into the node, it can be pushed through the remaining duct to the actual aerial location. Once both the aerial end, and the RF-container end, are secured, the excess cable is pulled through to the mausoleum in the centre and is zig-zagged back and forth to tack up the slack.

The cables are then scanned, as we keep an inventory of which cable was installed where. This is important as we need to know the exact lengths and propagation delays used in each location.

Thus, the cable installation for that antenna is completed.

Friday 27 July 2012

LBA installation progress — 27-Jul-2012

We've done it! At last the final LOFAR LBA aerials have been erected on the field. All 48 are now in place and the field is looking pretty complete. We still need to sort out some cabling in the LBA-mausoleum, and this will be carried out soon. However, for now, we can pause and celebrate the accomplishment of getting the aerials in place. Here's the final progress map:


Over the course of the next few days, we'll be posting up loads of photographs from the LBA build work, as well as reporting on the next stage of the installation and commissioning work. We will also be working on the data processing and some inventory work over the weekend. But, for now...

... have a nice weekend!

New reel

In the entrance to the RF-container, there are the ends of the cable ducts, where the signal cables emerge from the ground and go into the patch panel. Although the signal path is from outside to in, we actually feed the cables the other way when installing them. As the ducts are getting more and more crowded, we have had to improvise with the installation equipment that we use to do the work.

In this particular case, this meant designing and building a new cable reel. The cables are place on the reel side-by-side (cables for the X and Y polarisations). Although this may not seem like much, it makes a big difference to the work that we do.

The new cable reel, made from scraps of timber, left-over cardboard
and offcuts of agricultural drain. In the background, you can see the
duct entry points and part of the patch panels. (Photo: D. McKay-Bukowski)

Thursday 26 July 2012

LBA installation progress — 26-Jul-2012

Well, today was the day for which all the recent preparation work has been worth it. Today we managed to accomplish an amazing 12 antenna aerials installed, with only a single small team. We also managed to complete a large number of 40m cables, do the planning for the forth coming weeks and continue to press ahead on the HBA commissioning work. While this was going on, ASTRON engineers in the Netherlands were remotely logged in to continue their work on the system. At the end of the day, they reported that their validation work was complete (although some tuning of the timing remains to be completed). At this pace, there is simply no way that we can keep up with posting reports and photographs, but don't worry... they will be put up over the next few days. However, here is today's progress map...


This now presents us with a dilemma. Should we press on and try and accomplish the full LBA installation tomorrow, or will we go into weekend commissioning with a few remaining? Admittedly there are only eleven aerials remaining, but it is not clear how the weather will hold out. Still, it is an exciting time with huge amounts of visible progress.

Working under cover

There are several long cable runs that need to be made during the installation of the LBA field. These require a moderately dry environment to prevent excess water ingress into the cables. Additionally, we need to protect the trenches somewhat, just to stop them becoming muddy and difficult to work in. As a result, the team decided to build some temporary work shelters over the most vulnerable sections. These are the two mid-line draw trenches and the LBA-cable-mausoleum.

The shelters are not particularly sophisticated. Simply some spare build timber and some canvas. However, the accomplish the task of providing some basic protection for the open draw pits.

Building a frame of the first draw pit. (Photo: D. McKay-Bukowski)
The frame was screwed together to hold it in place. In order to keep the canvas in place, additional support timbers were tied to the frame (square lashings, for any knot-enthusiasts out there!). Then the canvases were dragged over.

Adding the canvas to the first draw pit. (Photo: D. McKay-Bukowski)

In order to secure the canvas to the ground, we used spare LBA anchor pegs. We have enough spare of these to get this done and the pegs have some very handy lugs that allow us to secure the corners of the canvas (with either bowlines or clove-hitches and 2 half-hitches, depending on the location). Not only did the draw pits get covered, but we also put some covering over the cable entry points in the LBA-cable-mausoleum. This was actually a lot easier, as the frame was already in place.

Securing some scrap plastic sheeting to the mausoleum frame. (Photo: D. McKay-Bukowski)
With all this done, we can proceed in pretty much all conditions with the cabling work.

Wednesday 25 July 2012

LBA installation progress — 25-Jul-2012

Today we only completed a single LBA aerial. However, we started a lot! Given the current conditions, the requirement to make more 40-metre cables and the added complication of having to scan the new half-lengths, the crew decided to try to get as much 80-metre cable work done as possible, giving the others a chance to make some headway on cable production. So, in total we installed 13 pairs of 80-metre cables, and quite a few pairs of 40-metre cables, but the aerials themselves have not been installed... except just the one!

Obviously we shall resume work tomorrow and, hopefully, have a more impressive progress map to show at the end of the day. But, for now, the good news is that we are now past the half-way mark.

Overnight, the observing team will continue to work on calibration and collecting test data.

RCU boards

The receiver unit (RCU) boards are the first part in the signal processing chain as the signals come into the RF-container. There are 96 of these in total in the KAIRA system (which is the equivalent of a Dutch Remote Station). There is one RCU per polarisation per antenna. Each RCU has three input channels. These are the high-band antennas (HBA), low-band-high (LBH) and low-band-low (LBL). On KAIRA, and other international LOFAR stations, only the HBA and LBH channels are used. These have the signals from the HBA and LBA arrays respectively. The third channel is for even lower frequency antennas (such as 10-30 MHz). At this stage, these antennas have not been realised, although there is some prototype work on this being carried out at the French LOFAR station (FR606, Nançay). On Dutch stations, the second part of the LBA arrays utilise this third channel.

The RCU subracks, with one of the RCU boards pulled out. (Photo: D. McKay-Bukowski)
What this means, is that it is not possible to use the HBA and LBA simultaneously on a given channel. While it is possible to mix and match between the different channel, each individual one is limited to a single input.

On these RCU boards are mostly switches and filters, but this then goes in to the sampler. This is a 12-bit analogue to digital converter, sampling at 160 or 200 megasamples per second (depending on the configuration). Once the signal has been digitised, down-converted and filtered the processing chain is common.

Tuesday 24 July 2012

LBA installation progress — 24-Jul-2012

Today we had a very productive day, despite numerous challenges. Firstly, the change in the weather conditions and the season meant that today the Finnish black fly decided to launch their summer offensive. This makes life somewhat unpleasant as these are no mere mosquitoes which take a sip and are gone. No, these little blighters make sure you notice, taking a bite and leaving a wound. Then, the weather has been coming and going in fits and starts, throwing down some serious amounts of water at times. Also, we reached the section where we need 120m cables. These are made by cutting and re-connecting 80m cables to give us additional extension lengths. This works well, but is time consuming. However, despite these challenges we had one of our best days, managing to install six aerials. Here's the updated progress map:

Progress as of the 24-Jul-2012. We have 24 out of 48 now installed.


This might not seem like a lot compare to the heady days of the LOFAR-UK installation. However, that build had the cables already installed (something usually taken for granted), whereas our team has to do that work pair-by-pair, cutting and fitting connectors by hand, fitting the metal armour and then slowly drawing them through a labyrinth of ducts, rather than being able to deploy them from reels at pace. Also we only have a few, albeit very capable, summer students to do this work.

So, all in all, we're delighted with today's work. We are now half-way! This sets us very well on our schedule for getting the array completed on time. Here

Clocking in

It is often asked what the sampling rates are (160 or 200 megasamples per second) and how they are synchronised. For this, the station uses a rubidium atomic clock. This small, temperature stabilised unit provides a 10 MHz clock signal, from which phased locked loops can generate the required sampling frequency. The rubidium itself is synchronised long-term with a GPS 1 PPS (pulse-per-second).

The rubidium frequency standard in the KAIRA equipment racks. (Photo: D. McKay-Bukowski)
Although seemingly not much, this actually a very important part of the system and the monitoring of the stability and accuracy of it is an important part of the quality assurance programme of the station.

Monday 23 July 2012

Antenna cross correlations

We are now routinely collecting data from KAIRA's High-Band Antenna (HBA) array. This operates in one of several receiver unit (RCU) modes which, with the use of filters and clock rates, allow us to get at different Nyquist zones in the spectrum. Most of the initial experiments that we are doing at with RCU mode 5 (which is approximately 110-190 MHz). There is one RCU per signal path. That is, one RCU per polarisation per antenna. For the KAIRA HBA array, we have 48 antennas (the tiles) and each one has 2 polarisations (linear X and Y) and we have 96 RCUs to process all of these.

When data is collected, it is split into frequency channels called subbands. Additionally, it is possible to run a small correlator in the RF-container, which will determine the cross-correlations for each pair of

The following plot shows an antenna cross-correlation (ACC) matrix. The two axes are the RCU numbers, from 0 to 95 (from left to right and from top to bottom). The shading is the level of correlation. The auto-correlations have been set to zero to make the plot more useful. Auto-correlations are what you get if you correlate an RCU with itself. Because this obviously will have a very strong correlation, these data would otherwise dominate the dynamic range of the plot, which is why they are clipped to zero for normal viewing.


KAIRA HBA(5) subband 240, just after midday UTC on 19-Jul-2012.

In the grand scheme of things, these data are really just an intermediate step along the way to getting the system calibrated and producing data streams from on-sky beams, or all-sky images. However, it is an important matter and being able to produce this sort of display is a very encouraging step towards the realisation of a fully working system. It represents the culmination of a lot of hard work and effort by a lot of people, from SGO, ASTRON and elsewhere and everyone involved should take heart that we are getting close now and that their endeavours are appreciated.

Calibration and commissioning work will be continuing this week. Hopefully we should have some even more interesting results to show soon!

Sunday 22 July 2012

Calibration life

While the building and construction on the LBA continue outside and the installation and setup goes on within the RF-container, there is another side to the work at KAIRA. Within the Lehtinen Barracks, some of the team are working on calibration and software.Despite what the crew outside might tell you, this is actually pretty intense work as we wrestle with all sorts of problems, software packages, operating systems, configurations and, of course... trying to make sense of the data.

The Lehtinen Barracks is a convert railway carriage, fitted out with desks and chairs and work benches. Scattered about are computers, cables, power supplies and various notes and drawings. The heater is running, but still the cool Arctic air gets in. And, when the wind blows, the entire barracks rocks gently back and forth, as it is suspended above the ground. The place smells of a strange mix between coffee and deet (= insect repellent). There are cups (both paper cups and traditional Finnish timber ones) strewn about and scattered here and there are (usually empty) packets of Angry Birds sweets.


What you don't get from looking at this photograph is the sound... do you remember the soundtrack from the original version of the computer game Die Siedler / The Settlers (1993 Amiga version, in-game music by Haiko Ruttmann and Markus Kludzuweit — LINK). Well, this is set to continuous loop and has been playing for several days now non-stop. With the sound of the wind, as well as digging, hammers, sawing and various other noise from outside, it is somehow vaguely appropriate. And, given that we have barracks, lots of stone and plenty of wood, the catch phrase whenever we need something is to add "... and we also need a granary!"

Saturday 21 July 2012

Setting up the networks

In parallel to the work on the tiles, it is also necessary to set up the computing and networks. This was done by Klaas Stuurwold from ASTRON. Klaas spent the entire time working in this spot behind the equipment racks. Here's a photograph of him in action.


Now, where have we seen this before, Klaas? Or does every LOFAR station come with a "Klaas Module" installed at the back of the RF-container?  :-)

Friday 20 July 2012

LBA installation progress — 20-Jul-2012

After a mixed week, we've finished(no pun intended) really well. Obviously there have been the ASTRON engineers on the site during the early part of the week and their work went well. We managed to get the HBA installation complete and the commissioning and calibration has now begun. We've had some delays due to some technical challenges, but there hasn't been anything that we have not been able to overcome with perseverance. The first data are now starting to come off the system and we are pleased with the results so far. There is a long way to go, of course, but we are confident that we can get there quickly so that the scientific experiments can commence.

On the LBA, there has been lots of hard work on trenches, cabling, ducts. Poor weather has slowed things down, as has some unforeseen issues with the drawing of cable lines. Unlike most international LOFAR stations, the cable work here is extremely complicated, requiring careful and painstaking work. However, the crew has managed to get these sorted out and today bears proof of that. In half a day alone, we managed to get five new LBA aerials installed and connected. Things are thus looking very good for when work on the LBA resumes on Monday.

The light-shaded LBA aerials are today's efforts.


General works around the site have also been going on during this week, and there's been good progress there too. The site is a lot more organised now  and it is starting to look complete in many areas. It has been great that everyone has found a spare moment here and there to help clean up, sort things out and make the place more presentable. Especially as it is without asking! The fact that everyone takes such professional pride in the work is great and it makes KAIRA a wonderful place to work.

There is a busy programme of software and calibration work planned for the weekend and construction and installation shall resume on Monday. Of course, watch for more photographs over the weekend as we catch up with the backlog! However, for now, it is time to sign off...

Have a good weekend, everyone!

HBA tile commissioning

As part of the commissioning work, it is necessary to check each antenna in each tile. For the most part, this is done from the RF-container. However, in the event of problems, we often need topen the tile up and access the electronics inside.

On most stations, the HBA tiles are on the ground. This means that you can easily step into them to fix them. As a result, we've made a special platform out of an old tile lid and some planks to let us safely access the centres of the tiles.

Our tile platform. (Photo: D. McKay-Bukowski)

Fitting a new front-end card. (Photo: D. McKay-Bukowski)

A new front-end card in place. Note the little LED near the centre, indicating correct
communications with the electronics in the RF-container. (Photo: D. McKay-Bukowski)

Thursday 19 July 2012

LBA installation progress — 19-Jul-2012

It was a slow day today. The rain varied between light drizzle and heavy rain. As a result, the crew concentrated on other tasks. These included completing the fence by the site entrance, checking on HBA tile water drains, and a variety of necessary trenching works. In addition to this we got a lot accomplished in terms of software configuration and development.


Still, we got one LBA aerial installed (#L31, in the lighter shade in the diagram). Hopefully the weather will improve soon so we can make some more progress soon.

Polarisation test aerial

In order to check that the polarisations have been correctly connected, we use a very low power signal, transmitted from a dipole on a test mast. We tried a number of locations in order to get sufficient power and contrast to verify the system.

Attaching the antenna to our P2P mast. (Photo: D. McKay-Bukowski)

The stand-alone mast. Note the test LBA aerial in the foreground. (Photo: D. McKay-Bukowski)

Scenes from the LBA installation

Here are a series of photographs from the installation of the Low-Band Antenna field. With so much activity going on at the site at the moment, we are starting to get behind on the photo-journal. Today we shall attempt to catch up again. Enjoy!

Putting the metal ground planes in place. (Photo: D. McKay-Bukowski)


Hammering in the anchor pegs. (Photo: D. McKay-Bukowski)

The engineer from ASTRON shows the team how to fit new cable connectors. (Photo: D. McKay-Bukowski)

The LBA Cable-Mausoleum, where surplus LBA cable is zig-zagged. (Photo: D. McKay-Bukowski)

Feeding new draw-lines on the main cable ducts. (Photo: D. McKay-Bukowski)

First band-passes

One of the first tests to be done on the new antenna systems is to "check the bandpass". This means plotting the signal strength as a function of frequency for the antennas. By examining this spectrum we can check that the antenna has the correct response and there are no sources of noise or error. It also allows us to see any radio-frequency interference (RFI)... which is typically from satellites or terrestrial radio stations. These bandpasses were first achieved on the 14th July 2012.

The first HBA spectrum, with all 96 channels. The tall peak in the middle of the
plot is actually our test signal (which will be switched off later).

The first LBA spectrum. At this stage, there are only two channels, as only one aerial had been installed.


These tests demonstrate not only that the antennas themselves are working, but that the signal processing chain is functioning up to the beamformer. Checking the beamformer is the next step in our commissioning.

Wednesday 18 July 2012

LBA installation progress — 18-Jul-2012

Today we continued work on the LBA. We started well, but thenthe draw string was starting to become twisted in the main cable ducts. a couple of antenna's worth later and it was completely jammed. As a result, we did not make as much progress as we did yesterday. Here is the progress diagram as it stood at the time we stopped for the evening meal.

Progress from today. The newly installed aerials are in a lighter shade.

Because of the blockage, we have opened up the two service pits and have cut open the ducts in those positions. We have drawn new lines for each one (and these are continuous, mono-directional loops). Markus has spliced some very smooth loops into them to allow us to hook on the cable draw-clips. Hopefully we'll be able to make some more progress tomorrow.

Not always dry

The weather, while usually pleasantly cool and overcast, is not always dry. Here are a few photographs from the days where the sky has been washing the site for us.

Although it looks like a lake, this is actually the floor of the LBA cable mausoleum. (Photo: D. McKay-Bukowski)

Droplets on one of the vehicle windows. If you look carefully, you can see the reflection of the HBA. (Photo: D. McKay-Bukowski)

First LBA installed

The first Low-Band Antenna (LBA) aerial was installed on 12th July 2012. We have already reported it, but with so much going on, it has taken us a few days to get around to posting the photographs!

The point at the ground where the cables come out of the post and go into the duct. (Photo: D. McKay-Bukowski)

At the top of the LBA aerial, there is a small black cap. This contains the amplifiers. (Photo: D. McKay-Bukowski)


The first completed LBA aerial — #L44. (Photo: D. McKay-Bukowski)

Tuesday 17 July 2012

LBA installation progress — 17-Jul-2012

Today's progress. This morning, we finished placing all the grids and hammering in the pegs. We then started working on the installation of the cables and aerials. The map here shows how far we've managed to get today.

LBA installation progress from 17-Jul-2012. The "light shaded" aerials are new.


During all of this, we were also working on the HBA commissioning with the ASTRON team. We now have working bandpasses on all HBA antennas. Overnight, we are running the first long-term accumulation of antenna cross-correlations (the so called ACC files) which we will use for further tests and station calibration.

Photographs to follow soon.

Running the cable pipes

In each of the shallow trenches on the LBA field, there are white agricultural drains, which we use as ducting for the cables. Because we have rocky, unforgiving soil, and the fact that it freezes up each winter, means that we need to provide additional protection for the cables that we have. This is in contrast to other LOFAR stations, where the cables are buried directly into the ground.

Laying the last of the ducts on the field. (Photo: D. McKay-Bukowski)


Taking a break. Yes, the duct has other uses. (Photo: D. McKay-Bukowski)


Installing the ducts leading into the HBA cable
mausoleum. As the ducts get closer to the RF-container, there are
more and more cables in each. This is why the duct diameters
in this location is larger. (Photo: D. McKay-Bukowski)